Very often, if your Honeywell thermostat stops working, you’ll need to change the batteries inside the unit. However, what’s the next step if you find that it doesn’t do the trick?
If your Honeywell thermostat refuses to work after you’ve changed its batteries, you can try a few steps, like checking the fuse and the furnace door. If those don’t work, you may need to do a full factory reset. This is annoying because it will wipe your settings, and you’ll have to enter them all again, but it should fix the issue.
Just changing the thermostat batteries isn’t always enough to get your system running again – and that’s why we’re going to use this article to look at a Honeywell thermostat not working after battery change: how to fix it. You’ll soon have a functional thermostat again!
What Type of Batteries Can I Use in My Honeywell Thermostat?

If you’ve replaced the batteries in your Honeywell thermostat, but it still isn’t working properly, you might be worrying if perhaps those were the wrong batteries type.
Luckily for you, there is a solution to this issue! For those looking for an alternative to Alkaline batteries, Lithium-ion batteries provide a great option for powering your thermostat.
You don’t need to be concerned about picking the appropriate battery; your thermostat will remain unharmed.
If you’re wondering what kind of batteries your device requires, simply check your thermostat manual – some models use AA while others use AAA.
Troubleshooting Guide: Honeywell Thermostat Not Working After Battery Change
Restoring your Honeywell thermostat to factory settings is an effective method of fixing problems – but it has the drawback of erasing all your current schedules and disconnecting your device from any other smart devices.
Putting everything back can involve quite a bit of work, so before you reset it, let’s look at a few other simple checks that might resolve issues after a battery change.
Check The Batteries

This is a very simple step, but it’s still worth doing. Take the cover off the thermostat’s batteries again and make sure the batteries are installed correctly.
They should usually be aligned facing up, but it’s worth checking the signs on the casing, as models may differ.
You should also make sure that the batteries you have added are identical to the ones you removed in terms of power and type.
Most Honeywell thermostats need alkaline AA or AAAs. It’s often best to purchase the same brand to ensure you get a match.
Try New Batteries
If you’ve just put new batteries in, you might think there’s no way that it can be those that are causing the problem – but it’s still worth trying a second batch of new ones, just in case there is a fault with the ones you bought.
This is a particularly important thing to check if the screen isn’t coming on, because this indicates that the thermostat isn’t getting power.
Clean The Terminals Of The Thermostat Battery Compartment

If you’ve recently replaced the batteries in your Honeywell Thermostat and are unable to get it working, clogged dirt between terminals may be the reason.
To ensure the performance and longevity of your battery and thermostat, it is important to clean the terminals of the battery periodically. This can be done most easily with a wire brush or a terminal cleaning tool.
You can use a wire brush or terminal cleaning tool to gently remove any corrosion from the surface of the battery terminals. Make sure to take care not to damage the terminals in any way.
Once the surface is clean, use a damp cloth to wipe away any remaining dirt or residue. Make sure that you do not leave behind any moisture on the surface of the battery terminals as this can cause corrosion and other issues over time.
Once you have cleaned the battery terminals, it is important to coat them with a thin layer of petroleum jelly. This helps to protect the terminals from future corrosion and also gives you an easier time when it comes to connecting and disconnecting the battery cables.
Following these steps, you should be able to keep your battery running smoothly for many years to come.
Taking the time to clean your battery terminals regularly can help save you money in the long run.
So make sure that you don’t forget to perform this step in your regular maintenance routine!
Check The Wiring
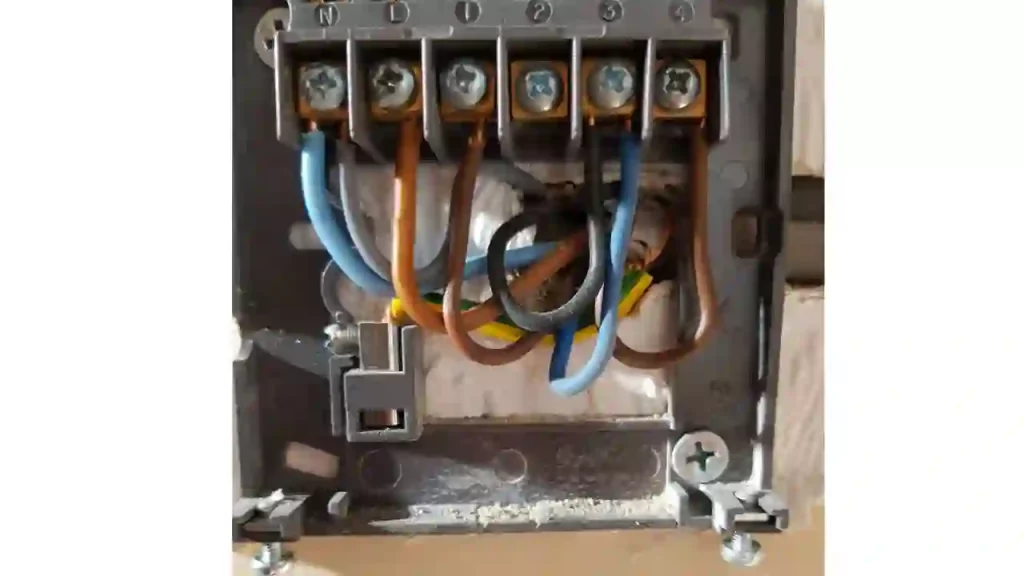
Before you do this, you should make sure your thermostat is powered off and disconnected from any power supply so there’s no risk of electrocution.
Next, remove the top cover, and inspect the wiring. It’s possible something got knocked out of position when you were changing the batteries.
See if any wires are out of line, if any breaks, or if there is any visible damage. If there is, you may have to get the thermostat repaired or replaced.
Check The Furnace’s Access Door
Your furnace’s access door has a switch inside that will prevent the thermostat from working if the door has been left open. It’s worth making sure that the door is closed, even if you don’t think it has been touched recently.
Open and shut the door to ensure that the switch is fully depressed, and then check whether the thermostat is working again.
Replace The Fuse

Not all Honeywell thermostats depend upon a connection to your house’s wiring, but if yours does, you may need to replace the fuse after changing the batteries. A system overload can cause the fuse to blow or your circuit breaker to trip.
Replacing batteries won’t make the system work again if either of these things has happened.
You will need to replace the blown fuse or reset the breaker to make your thermostat come back on. Once you’ve done this, you should be able to use your thermostat again.
How Do You Reset Your Honeywell Thermostat?
If none of the above fixes work, you will probably need to reset Honeywell thermostat to solve the problem.
Factory resets are a great way to resolve a multitude of errors with a Honeywell thermostat, including problems following a battery change.
Unfortunately, though, you will lose all your settings, so be aware of this before you go ahead. You might want to write them down so it’s easy to reprogram them when the thermostat has finished resetting.
Different thermostat models will require different approaches. If you have a Honeywell Smart or a Lyric Round Thermostat, you can use this method:
- Click and hold the cloud icon
- Scroll down through the options until you see the Reset option
- Select Reset and confirm.
If you have a Honeywell T5, T5+, or a T6, follow this method instead:
- Click and hold the Menu icon, and then press Symbol until you see the Reset option
- Select Reset and confirm.
If you aren’t sure how to perform a factory reset on your particular Honeywell model, you should refer our guide. It should give full instructions for you to follow.
Some people also suggest resetting the thermostat by putting the batteries in the wrong way around. To do this, you put the positive end of the battery into the negative end in the thermostat and vice versa with the other battery.
Leave them in this position for around 10-20 seconds, and then turn them back around the right way.
This may work, but you can use the Reset in the display in most cases, which is often easier.
You should now have a reset thermostat that will hopefully work as intended. You will need to re-enter your previous settings and reconfigure the device to work with other smart devices in the home.
Other Important Tips For Replacing Your Honeywell Thermostat’s Batteries Correctly
- For optimal performance, be sure to follow your thermostat user manual and use only the proper type and size of batteries.
- Ensure the batteries are inserted in their correct orientation, with positive and negative terminals facing the right direction.
- To ensure optimal performance, never replace a single battery; be sure to always swap both your old batteries together with new ones.
- Avoid banging on the thermostat to fix it – this could lead to severe damage to its components.
- If, after battery replacement, it continues to not function properly, consult a qualified HVAC technician for advice on how to troubleshoot and find effective solutions.
Conclusion
Hopefully, this article on a Honeywell thermostat not working after battery change: how to fix it has helped you, and your thermostat is now working normally again.
You may have a faulty thermostat if none of these fixes are effective. Contact Honeywell Support or Talk to an expert, and consider replacing the unit to get your system up and running again.
Frequently Asked Questions
Why does my Honeywell thermostat say system wait after changing batteries?
If you are seeing the “Wait” message on a Honeywell Thermostat display, it means that the thermostat is waiting to activate the HVAC system to protect your HVAC system compressor from damage. The Wait message disappears in a few minutes if the thermostat is working properly.
Can low battery cause thermostat problems?
Batteries help you to keep your programmable thermostat’s settings intact in the event of a power outage. When the batteries are low, you risk losing those carefully crafted settings and compromising the efficient control of your HVAC system.
Why is my Honeywell thermostat screen blank?
If you use a Honeywell thermostat, the blank display might be caused by an incorrectly closed furnace door.
Thermostats are DESIGNED to shut off automatically when the furnace’s door is not fully closed. To make sure this isn’t your issue, double-check that the furnace door is closed properly!
Can I Replace My Honeywell Thermostat’s Batteries Myself?
Yes, you can replace the batteries in your Honeywell thermostat yourself. It is a simple process but it does require that you know which type of battery your model requires.
Check the manual for specific instructions on how to change the batteries and what type of battery to use.
You will need a screwdriver, usually a Phillips head, to take the cover off and access the battery holder.
How Long Do Honeywell Thermostat Batteries Last?
Honeywell thermostat batteries typically last for about two years. The type of battery used may also affect how long it will last.
To get the most life out of your batteries, make sure that you are using them in a temperature-controlled environment, as extreme temperatures can cause the batteries to run down faster.
Additionally, it’s a good idea to change the batteries every two years so that you don’t experience any issues with your thermostat.