The time has come that your kitchen, bathroom or en suite requires a complete makeover. You may have already selected the new stylish tiles you want but you know you got some problems. You need to remove the tiles.
The process of removing old tiles can be difficult and exhausting. It also involves a high risk that could lead to damage. If you want to undertake the task of removing tiles, then you should expect a lot of dust and noise.
Before you begin removing your tiles, you should consider:
Safety First
The moment you begin chipping your tiles away, you will realize some shades of porcelain and ceramic will begin flying all over the room. It is therefore, very essential to ensure you are well protected.
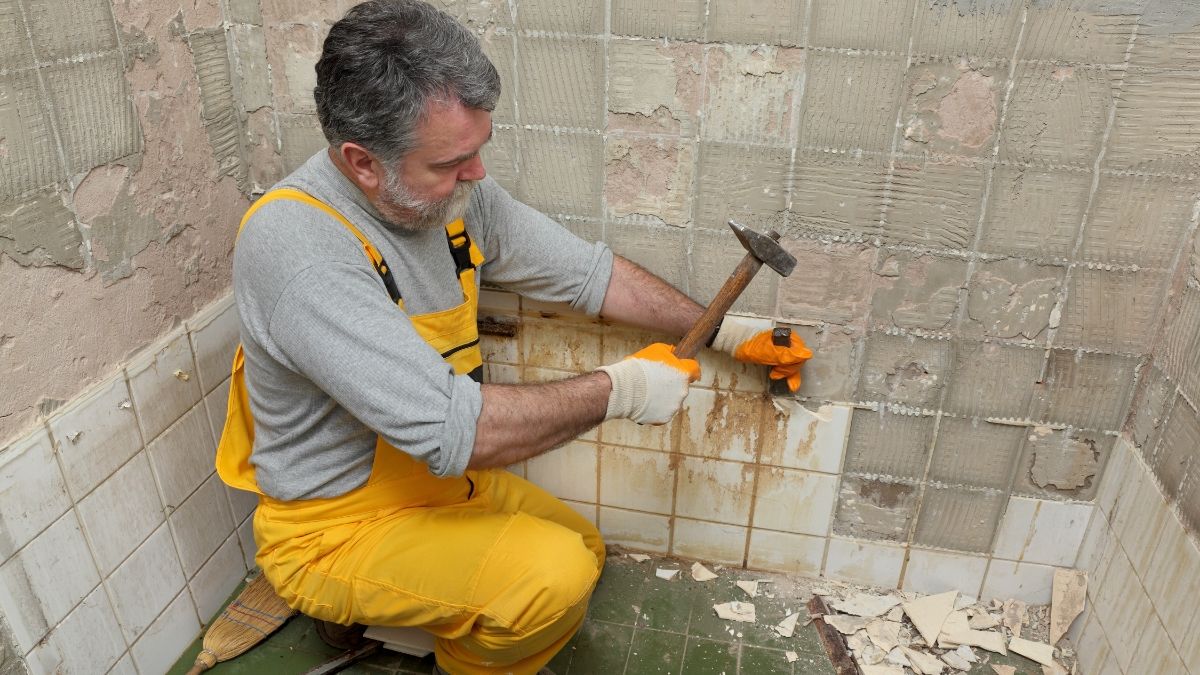
You should at least wear protective gloves and safety goggles to ensure your eyes and hands are protected from pieces of tiles that may shoot from the wall or the floor.
Cover up your sink, bath and shower trays
This is why removing tiles is quite difficult. One needs to be keen not to mess around with everything. The moment you are armoured up, you should also protect the room around you.
One thing for sure is that if large and sharp pieces of tiles start falling from the wall to your shower tray, bathtub or sink, they may cause some ugly scratches.
You should cover them up with cardboard and protect them from these falling pieces from tiles removal.
One thing you should realize is that removing the first tile proves to be the hardest thing
This is because it usually has no easy access from all sides. You will have to use the butt of the hammer, and prod the corners of random tiles. This will be noisy, dusty and involving process. You will then have to feel the loose one, it will prove a little bit easier to remove. You will have to prize it out with the chisel.
If no tile becomes loose, you will be required to break one at least. This will be done by sticking at the center of the tile and then hitting it hard with a hammer. The force generated here will be enough to shatter the tile and you will now be able to remove the individual pieces.
After successfully removing the first tile, you will now have access to gaps behind the surrounding tiles. You will be required to place the chisel against the floor or wall with its point tucked well behind the tile you are working on and then tap it with the hammer until it gets under the tile you are working on.
The next thing you need to do is pull the chisel towards you slowly and that should be enough to prize the tile from the wall or floor. This will require a lot of attention from you because the technique is not as easy as it sounds.
Noise and Dust
The removal is a daunting task and only a few people can actually claim it to be enjoyable. In order to make it more convenient, one should ensure that the room he/ she is working on is empty and all the furniture and equipment relocated to another space.
This will be very beneficial because it will ensure that the furniture is not embedded by all the dust that is produced during the tile removal process.
You should additionally glue the door to the room you are working on with a building foil for it helps trap the fine dust and construction materials from spreading through the entire apartment.
You should then ensure that you have electricity in the room and a flat wide chisel attachment of around 25 mm. You will also need to have a ladder, bucket and a shovel.
Understanding the angle of tile
When working on tile walls, you will be required to first tap the tilted wall and hear if you can find a cavity. Then after this, you start on the tile that has a cavity and remove it with a chisel. If you have an electric stamper, this could even prove to be better.
Ensure that the flat chisel is at an angle of 45 degrees to the tile. If the tiles prove to be difficult to remove, you will have to shatter it rather than remove it.
If in other instances you find that the angle is too dull, you will be required to cut holes in the wall to be able to continue with your tile removal activities.
Removing the Tile Adhesive
The moment the tiles have been removed, you can proceed to remove the remaining adhesive using a sander as you prepare to substrate the new design of the wall.
Since removing tiles proves to be a difficult task, one should access the options of either beautifying the already existing tiles or removing them.
If for instance one has decided to change their bathroom tiles, they should consider very keenly if the right kind of renovation is what is required for a substantial amount of cosmetics needs to be operated.
If it is for a small cosmetic procedure, there is an actual possibility of painting tiles that you no longer want but they are still in good shape. This can be done by simply painting these tiles which will not generate any sort of dust or grim and results in a new beautiful look that suits your home decoration within a very short period of time.
Another method of beautifying the current tile wall you have without necessarily removing any tiles is by sticking of another layer of tiles.
To do this, a lot of caution is required. This is because the permanent load bearing capacity of lower tile surfaces will be questioned by experts on a regular basis. The technique also creates a wall that is too thick.
If your bathroom is particularly small, this method will not be ideal at all.
Another thing that makes the process of tile removal difficult is the follow up work that is involved. Depending on how long the old tiles have been used on the floor or the wall, the work process in the removal of the plates can be a daunting one.
This is if your old tiles were applied using tile adhesive. It will for sure increase the kind of work you will have to do after removing these tiles because the wall or the floor will be heavily damaged. There are large parts of your floor and will prove to be expensive.
The wall and floor will have to be repaired with more plaster and this makes the entire tile removal process to be more laborious.
Removing tile by Professional
If you decide to hire a professional to remove your old tiles, you must be prepared to pay expensively if you need proper work to be done.
You will find out that most craft companies remove the floor and wall tiles using a drill and a hammer. Before they start working, they will require you to vacate all the belongings from the room they are working on.
The most ideal way they will do this is by using the hammer to eliminate all the joints. This will be too noisy and dusty and will disrupt everything in your home. While doing this, wall tiles will most definitely start falling to the ground by themselves.
This should raise the question of whether there are water pipes or electric cables that run along. If any, such points should be handled with proper care to prevent damages and accidents from happening.
Even when this kind of work is done by professionals, they will also at some point use the hammer drill. This equipment usually has the lowest possible angle to the ground and this helps in preventing deep penetration into the ground which could cause damages to the floor heating system.
If the floor heating system is close to the ground, one should refrain from using a rotary hammer and tiles should only be removed using the miler and a hand chisel. This shows you the difficulties involved in tile removal and the number of risks involved. This kind of work is best left professional craft companies.
How to remove tile with a chisel and hammer if you have a heating system close to the ground.
The first thing you do is carefully tap off the tile wall using the handle of the screwdriver and other tools as well. The moment one hits something like a hollow, one will be able to hear a sound that is dull in away. You will be required to pick a chisel and a mite and carefully remove one tile.
This will give you sufficient space to use an electric stamper that is equipped with a chisel that has a completely flat attachment. The chisel usually has a cutting edge slope of 45 degrees.
The moment you remove all the tiles, you can smooth the surface carefully until the surface becomes clean and level. At this point, you can now place the new tiles.


